Monday, December 8, 2014

Watch For These Blog Titles

Whats next?

Blogs Coming Soon

  • Chipotle  Raspberry Jam  (January)
  • Gluten Free Flour Tortillas  (January)
  • Featured Art from Sherman Street Design  (Dec. 15th)
  • Sequim/Port Angeles Vacation  (Dec. 12th)

Wednesday, December 3, 2014

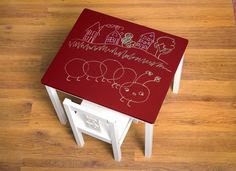
DIY - Any Color Can Be A Chalkboard

any color can be made into chalkboard paint

Walls, Furniture, or Accessories

I've heard of  adding (2 tbls) grout to (1 cup) latex paint to create a chalkboard.  However, I've never done that, so I can't say how well it works.  What I have done successfully is a long process of painting, drying, sanding, repeating.

Here's how its done:

I'm assuming your item is ready for paint (clean, sanded smooth and dry), and you've picked out your favorite color (latex: flat, eggshell, or semi-gloss all work).

You will need to paint the entire surface you want to be a chalkboard with a smooth (sponge brush works great) brush from the left upper corner to the right lower corner (diagonal).  Let dry.  Now you need to take steel wool and sand the entire painted surface.  Last, Clean the surface.  Repeat this process in all directions.  (right upper to left lower, top to bottom, side to side) drying and sanding between each direction.

Once your done with this process, then you take white chalk and rub the entire surface from left upper corner to right lower corner, then wipe it off until all the chalk is off.  Repeat this process in each direction (right upper to left lower, top to bottom, side to side) wiping off the chalk each time.  Now you can take your favorite cleaner and clean the surface.  Your done.  This method is very durable, after all there are four layers of paint on the surface!!

I have chalkboard painted desks, dressers, doors, chairs, walls, trays, wine bottles, mason jars, glass, ceramic, and clay pots with this method.  My next experiment with this method will be tee-shirts!!

Thanks for visiting :)

Check out my Etsy shop

Saturday, November 22, 2014

November Featured Item - Hummingbird, Book Page Necklace

Hand Painted Hummingbird, Book Page Necklace

Featured Item - Hummingbird, Book Page Necklace

I love hummingbirds, their beautiful colors, their small size, and the sound they make as they fly. Over the years I've included them in my scratch board designs, murals, greeting cards, glass etching, framed art and jewelry.

The image within this focal bead is my original artwork - a hand-painted silhouette of a hummingbird - on a vintage book page, it is copper gilded to create a metallic shimmer. It is then sealed with copper, silver or gold enamel to protect the artwork. Bails are then crafted and attached in order to hang from your choice of 18-24" stainless steel ball chain. A dangling bead in your choice of pink, purple, blue, red, or black is added for more movement and sparkle.

18-24" stainless steel ball chain
Focal bead and dangle are approx 2 1/2"

The book pages I use are original (not photo copies). They are from a vintage book called "Birds That Every Child Should Know" published in1907 by Neltje Blanchan. Your necklace will come with a quote from the page your necklace is from.

Each necklace pendant is one of a kind (OOAK)
* book page is original
* hand painted image
* image placement varies
* enamel sealant varies

Each necklace is packaged in a post consumer, recycled, box, fitted with a non-tarnishing white fiber fill.

Coupon code for our readers!

You can purchase this through our Etsy shop for  $36 plus shipping.  We are extending to our readers a coupon code for this featured item, please send us a message on Etsy telling us that you read this blog to receive this necklace for $29.99 plus shipping.

Friday, November 21, 2014

New Look - New Name

digital design by Charlotte for Sherman Street Design

Shop Announcement -

I've started so many sentences then back spaced out of them.  I'm shocked that I have not blogged since January, I think you'll agree that playing catch up just wont work.  So I'll just announce to you that I am no longer just Chars Wild Art.  What?  My husband and I have been kicking around the idea of working together for years and now we are jumping in with both feet (or four feet)  - drum roll please - we started a new journey together....Sherman Street Design!!

We have combined our talents to reclaim wood and glass into home decor, garden decor and wearable art. 
  • Glass Garden Flowers
  • Tea Cup Bird Feeders 
  • Bird Baths
  • Wine Signage
  • Wine Racks
  • Lighted Coffee Tables
  • Electrical Wine Bottle Chandlers & Wind chimes
  • and more
While still offering Bird Houses, Glass Etchings, and vintage inspired Jewelry.

We are also on Etsy 

Friday, January 17, 2014

Perfect Brown Rice - How to


Most of you (regular readers/friends) know that my family had to make some changes in our diet.  We have several food intolerance, sensitivities, and allergies.  Yes, each of those have different symptoms and reactions!

My son, reason one for dietary changes is his health
Lets face it white rice is pretty to look at, it taste good, and its quick to make!  But we don't eat it anymore :( and had to make the change to brown rice.  One reason was due to my son and I are both borderline diabetic, meaning our sugar index is very high.

When it comes to rice labels the packaging can be deceiving!.  According to the box the only difference is brown rice has 3 grams more fiber and 1 gram of fat. While white rice  has no fat.

However, consider this interesting fact:  People become diabetic because our organs produced enough insulin designed in its lifetime (about 100 years) but it is being used within 20-40 years.  Research shows its due to over consumption of white rice/ white flour!!  White rice, once digested, the blood sugar levels boost high and insulin has to be released to control the blood sugar levels.  However, when brown rice is eaten, it digest slowly with the fiber layer on top and it gradually release sugar, so blood sugar levels stay normal.

When I first made brown rice I treated it like white rice, the results were disastrous! Soggy, sticky mush!!  Totally gross.  Then I learned from my Mexican friend how they make rice at the restaurants.  They don't boil it!!  You sautee it.  Here's how:

You'll need:

1 cup brown rice
2 cups liquid (liquid is water, some kind of broth, or for Mexican rice add a can of stewed tomatoes)
2 tbl favorite oil (olive or coconut is good)
spices ( I add about 5 cloves and two pinches of coriander, this is a good combo for just about any dish)

  • Rinse the rice (its a pain, but it washes off the starch and cleans it
  • Heat your sautee pan to high, add your favorite oil
  • once this heats add the rice, stir it around.  It will start to brown and make a slight pop sound
  • add your spices, stir
  • add your liquid (it will steam and instantly boil, be careful)
  • cover, turn down to simmer for 45 minutes.
Fluffy Brown Rice

 Serve with.....anything!!


Friday, August 16, 2013

Wenatchee Wineries - 2013

Great Friends * Delicious Wine *Beautiful Scenery

That sums up our summer of 2013  winery tour vacation!  Nothing is better than relaxing with friends, sipping wine and looking out at beautiful scenery surrounded by the sounds of birds and the smells of blossoms in the air.

If you've been to Wenatchee you know there are a lot of wineries in the area!!  However, many of them are indoor tasting rooms without views, some are in industrial areas or in warehouses, as we discovered last year.  This year we knew we wanted to just sit back, relax outdoors with our friends in a "winery" sitting, while being able to bring our own cheese, meats and chocolates and stay for awhile.  Below are three of our favorite wineries that are worth a visit.

Silvara Vineyard

This one is my favorite, and the first winery we go to every year.  Sitting on a hill top looking over the Wenatchee River and the valley beyond. The view here is the best!  A beautiful lodge-style tasting room - with plenty of room to cozy up to the fireplace in the cooler months.  Or sit outdoors under a shady umbrella and enjoy the view. 


Silvara Winery - Leavenworth, WA

Enjoying the view at Silvara Winery
Silvara Winery - Lodge Style Tasting Room

Silvara Winery is located at 77 Stage Road in Leavenworth.  Visit their website for hours, details and view their photo gallery.

Icicle Ridge Winery

Off the beaten path and along the Wenatchee River you'll find Icicle Ridge Winery, a log-cabin style tasting room with great views of the pear orchard and a large pond.  This is one of our stops every year for its relaxing atmosphere and laid back country feel.  
Icicle Ridge Winery - Peshastin, WA
Log Cabin Style Tasting Room
Icicle Ridge is located at 8977 North Road in Peshastin.  Visit their website for more information, photos and more.

Saint Laurent Winery

This is a must go to winery in Malaga, just outside of Wenatchee.  Excellent wine, large grape vineyard, ponds and they have games to play on the lawn!!  

It is with a sad heart I tell you the owners are closing this winery on September 1, 2013.  I understand they sold the name to a business in Seattle, it is my hope they will re-open this tasting room, so keep checking back at their website - or here, if I hear anything I will update this post!! 
Saint Laurent Winery - Malaga, WA

Tasting Room - Lawn for games!

BEST WINE

Beautiful Grounds at Saint Laurent Winery

Ponds


Saint Laurent is currently located at 4147 Hamlin Road in Malaga.  Keep checking their website for more information regarding their pending retirement. 

Do you have a favorite winery in the Wenatchee area?  Comment & share!!  Hope you enjoy your next Wenatchee Winery Tour!! 


Wednesday, July 24, 2013

Healthy Popsicles - Sugar, Dairy and Dye Free

We have been looking EVERYWHERE for a completely healthy Popsicle with out fake sugar, refined sugar, dairy, preservatives and dyes. I have to tell you, they DON'T exist, commercially anyway.

 I bought the healthiest all fruit (strawberry) Popsicle that I could find in the Health section of Fred Meyer.  I then let my boy only eat only 1/2 at a time, which is not satisfying at all - poor little guy.  The problem is they were not a "perfect" solution so then I bought this handy little Popsicle mold at my local Fred Meyer store.  I decided I would chop up one of the Strawberry Popsicle and divide it among the four molds adding home made lemon aid over the top, below is the result.
Strawberry - Lemon Aid Popsicle

1 Box of Healthy Choice All Fruit Popsicle
2 lemons (squeezed)
2 cups filtered water
1 scoop pure Stevia

Chop up one All Fruit Popsicle, place the pieces in Popsicle mold.  
Mix together lemon juice, water and stevia. -taste and adjust
according to your personal preferences- 
Pour this mixture over the chopped fruit Popsicle.  
Freeze.  Enjoy.
As an alternative to purchasing All Fruit Popsicle, 
the next time I made these I chopped up frozen strawberry's
and then followed the same instructions.


Someone in my car group told me I could add yogurt for an even different flavor - and look!!  I have such smart friends :).  I have tried this style with both goat yogurt and coconut yogurt.   


Fresh Fruit and Yogurt Popsicle

Goat yogurt (or coconut yogurt)
**Fresh Blackberry's (or other fresh fruit)
1 scoop Stevia

In a blender, mix together your fresh fruit, 
Stevia and about 1/4 cup of your choice yogurt.
Place a spoon full of Yogurt into each
Popsicle mold, then pour a small amount of
blended fruit, alternate those two ingredients until
the molds are full.  Freeze.  Enjoy.

Thanks for joining us.  Please send me your home made, healthy Popsicle recipes!!

**I realized today, this photo and recipe was with Blackberry's not strawberry's although any fresh fruit will work.